Questa guida copre la creazione di un blog con EmDash, dalla definizione del tipo di contenuto alla visualizzazione dei post con categorie e tag.
Prerequisiti
- Un sito EmDash configurato e funzionante (vedi Per iniziare)
- Familiarità di base con i componenti Astro
Definire la collection Posts
EmDash crea una collection “posts” predefinita durante il setup. Personalizzala dal pannello admin o dall’API.
La collection posts predefinita include:
title- Titolo del postslug- Identificatore URL-friendlycontent- Corpo in testo riccoexcerpt- Descrizione brevefeatured_image- Immagine di intestazione (opzionale)status- bozza, pubblicato o programmatopublishedAt- Data di pubblicazione (campo di sistema)
Creare il primo post
-
Apri il pannello admin su
/_emdash/admin -
Clicca su Posts nella barra laterale
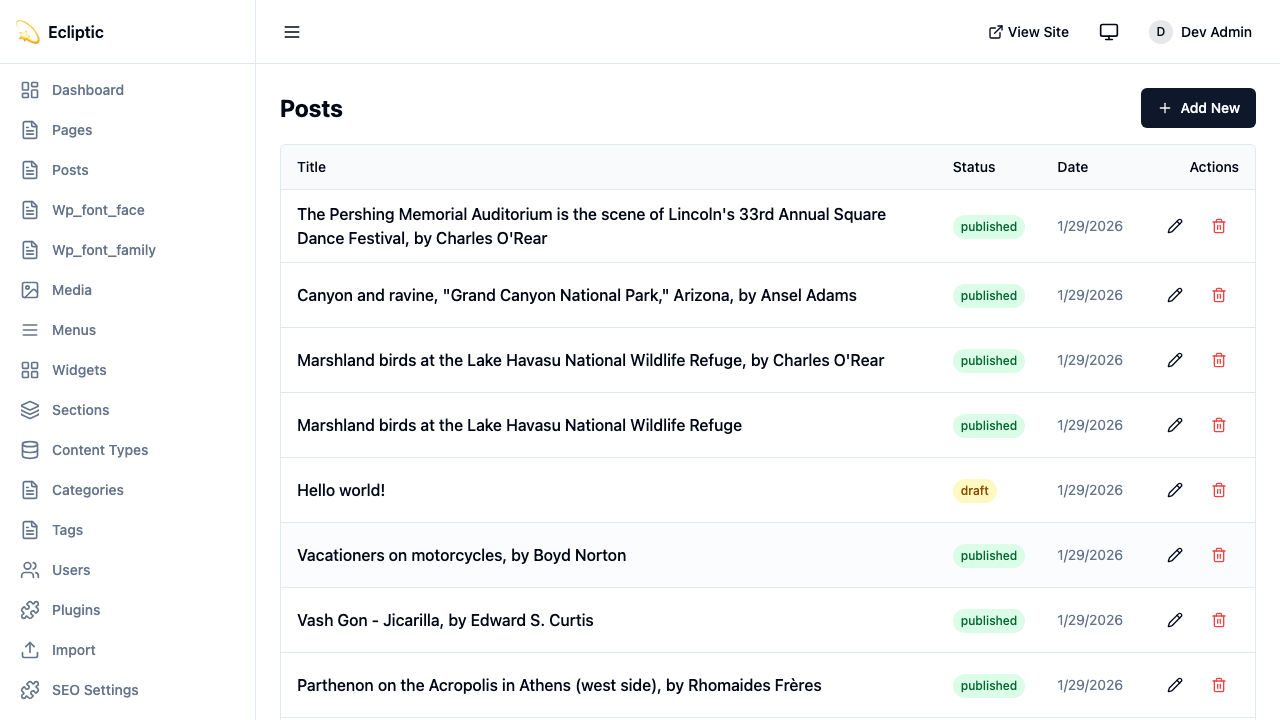
-
Clicca su New Post
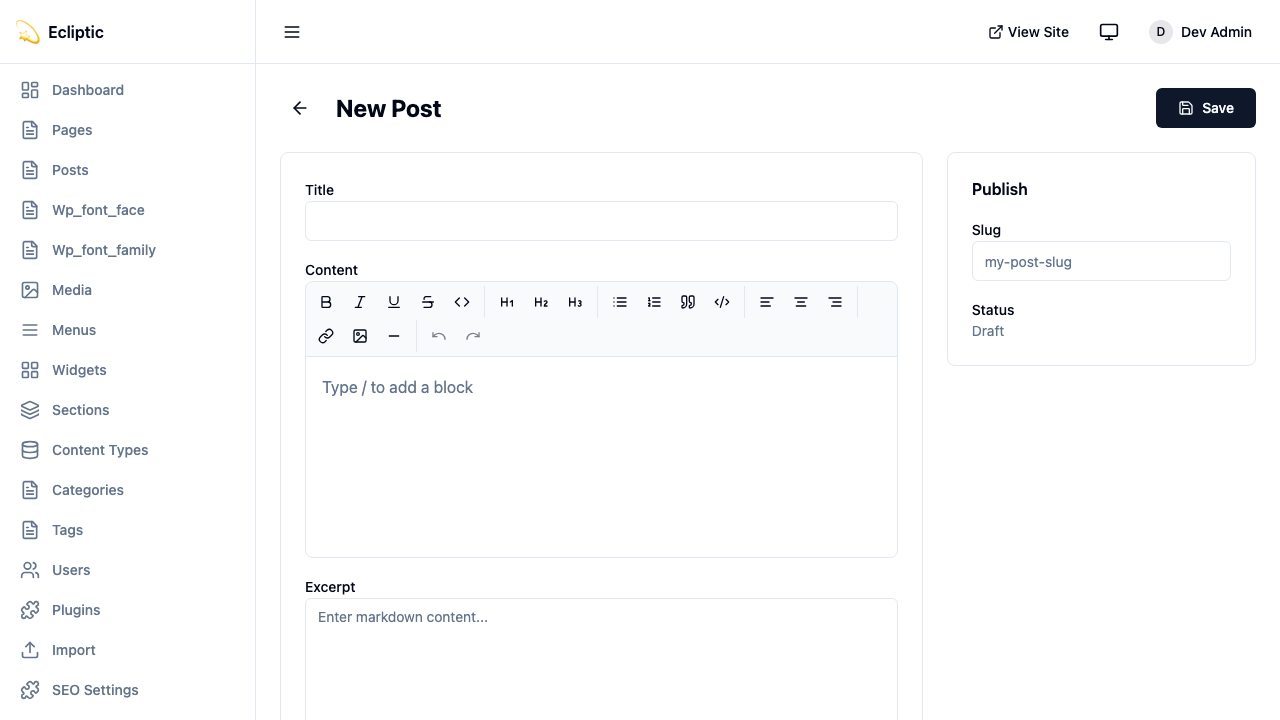
-
Inserisci un titolo e scrivi il tuo contenuto usando l’editor di testo ricco
-
Aggiungi categorie e tag nel pannello laterale
-
Imposta lo stato su Pubblicato
-
Clicca su Salva
Il post è ora online e appare immediatamente.
Visualizzare i post sul tuo sito
Elencare tutti i post
La seguente pagina mostra tutti i post pubblicati:
---
import { getEmDashCollection } from "emdash";
import Base from "../../layouts/Base.astro";

const { entries: posts } = await getEmDashCollection("posts", {
  status: "published",
});

// Ordina per data di pubblicazione, più recenti prima
const sortedPosts = posts.sort(
  (a, b) => (b.data.publishedAt?.getTime() ?? 0) - (a.data.publishedAt?.getTime() ?? 0)
);
---

<Base title="Blog">
  <h1>Blog</h1>
  <ul>
    {sortedPosts.map((post) => (
      <li>
        <a href={`/blog/${post.data.slug}`}>
          <h2>{post.data.title}</h2>
          <p>{post.data.excerpt}</p>
          <time datetime={post.data.publishedAt?.toISOString()}>
            {post.data.publishedAt?.toLocaleDateString()}
          </time>
        </a>
      </li>
    ))}
  </ul>
</Base>
Visualizzare un singolo post
La seguente rotta dinamica renderizza un post individuale:
---
import { getEmDashCollection, getEmDashEntry } from "emdash";
import { PortableText, Image } from "emdash/ui";
import Base from "../../layouts/Base.astro";

export async function getStaticPaths() {
  const { entries: posts } = await getEmDashCollection("posts", {
    status: "published",
  });

  return posts.map((post) => ({
    params: { slug: post.data.slug },
  }));
}

const { slug } = Astro.params;
const { entry: post } = await getEmDashEntry("posts", slug);

if (!post) {
  return Astro.redirect("/404");
}
---

<Base title={post.data.title}>
  <article>
    {post.data.featured_image && (
      <Image image={post.data.featured_image} alt="" />
    )}
    <h1>{post.data.title}</h1>
    <time datetime={post.data.publishedAt?.toISOString()}>
      {post.data.publishedAt?.toLocaleDateString()}
    </time>
    <PortableText value={post.data.content} />
  </article>
</Base>Aggiungere categorie e tag
EmDash include tassonomie di categorie e tag integrate. Vedi Tassonomie per dettagli sulla creazione e gestione dei termini.
Filtrare i post per categoria
La seguente rotta elenca i post di una singola categoria:
---
import { getEmDashCollection, getTerm, getTaxonomyTerms } from "emdash";
import Base from "../../layouts/Base.astro";

export async function getStaticPaths() {
  const categories = await getTaxonomyTerms("category");

  // Appiattire le categorie gerarchiche
  const flatten = (terms) => terms.flatMap((t) => [t, ...flatten(t.children)]);

  return flatten(categories).map((cat) => ({
    params: { slug: cat.slug },
    props: { category: cat },
  }));
}

const { category } = Astro.props;

const { entries: posts } = await getEmDashCollection("posts", {
  status: "published",
  where: { category: category.slug },
});
---

<Base title={category.label}>
  <h1>{category.label}</h1>
  {category.description && <p>{category.description}</p>}

  <ul>
    {posts.map((post) => (
      <li>
        <a href={`/blog/${post.data.slug}`}>{post.data.title}</a>
      </li>
    ))}
  </ul>
</Base>
Mostrare le categorie del post
Il seguente componente mostra le categorie e i tag assegnati a un post:
---
import { getEntryTerms } from "emdash";

interface Props {
  postId: string;
}

const { postId } = Astro.props;
const categories = await getEntryTerms("posts", postId, "category");
const tags = await getEntryTerms("posts", postId, "tag");
---

<div class="post-meta">
  {categories.length > 0 && (
    <div class="categories">
      <span>Categorie:</span>
      {categories.map((cat) => (
        <a href={`/category/${cat.slug}`}>{cat.label}</a>
      ))}
    </div>
  )}

  {tags.length > 0 && (
    <div class="tags">
      <span>Tag:</span>
      {tags.map((tag) => (
        <a href={`/tag/${tag.slug}`}>{tag.label}</a>
      ))}
    </div>
  )}
</div>
Aggiungere la paginazione
Per blog con molti post, la seguente rotta pagina la lista dei post:
---
import { getEmDashCollection } from "emdash";
import Base from "../../../layouts/Base.astro";

const POSTS_PER_PAGE = 10;

export async function getStaticPaths() {
  const { entries: allPosts } = await getEmDashCollection("posts", {
    status: "published",
  });

  const totalPages = Math.ceil(allPosts.length / POSTS_PER_PAGE);

  return Array.from({ length: totalPages }, (_, i) => ({
    params: { page: String(i + 1) },
    props: { currentPage: i + 1, totalPages },
  }));
}

const { currentPage, totalPages } = Astro.props;

const { entries: allPosts } = await getEmDashCollection("posts", {
  status: "published",
});

const sortedPosts = allPosts.sort(
  (a, b) => (b.data.publishedAt?.getTime() ?? 0) - (a.data.publishedAt?.getTime() ?? 0)
);

const start = (currentPage - 1) * POSTS_PER_PAGE;
const posts = sortedPosts.slice(start, start + POSTS_PER_PAGE);
---

<Base title={`Blog - Pagina ${currentPage}`}>
  <h1>Blog</h1>

  <ul>
    {posts.map((post) => (
      <li>
        <a href={`/blog/${post.data.slug}`}>{post.data.title}</a>
      </li>
    ))}
  </ul>

  <nav>
    {currentPage > 1 && (
      <a href={`/blog/page/${currentPage - 1}`}>Precedente</a>
    )}
    <span>Pagina {currentPage} di {totalPages}</span>
    {currentPage < totalPages && (
      <a href={`/blog/page/${currentPage + 1}`}>Successivo</a>
    )}
  </nav>
</Base>
Aggiungere un feed RSS
Il seguente endpoint genera un feed RSS per il blog:
import rss from "@astrojs/rss";
import { getEmDashCollection } from "emdash";

export async function GET(context) {
	const { entries: posts } = await getEmDashCollection("posts", {
		status: "published",
	});

	return rss({
		title: "Il mio Blog",
		description: "Un blog costruito con EmDash",
		site: context.site,
		items: posts.map((post) => ({
			title: post.data.title,
			pubDate: post.data.publishedAt,
			description: post.data.excerpt,
			link: `/blog/${post.data.slug}`,
		})),
	});
}
Il feed dipende dal pacchetto @astrojs/rss. Il seguente comando lo installa:
npm install @astrojs/rssProssimi passi
- Lavorare con i contenuti - Imparare le operazioni CRUD nell’admin
- Libreria media - Aggiungere immagini ai tuoi post
- Tassonomie - Creare sistemi di classificazione personalizzati